MuSyC - Multi-Synchronous Cut
The multi-synchronous cut (MuSyC) facilitates the editing of multitrack recordings with a very large number of tracks and with several successive recording takes, as is often the case with classical music recordings.
For pop music or similar, recordings of multiple takes of the same section can be made on top of each other in the same section of the project. The tempo and musical position is clearly defined, often guided by a click track or pre-recorded guide track. Takes are created that can be exchanged on the object and conveniently selected and combined using Take Manager and the Take lanes.
In classical recordings, working with takes in this way is impractical: a large number of tracks are often recorded, but they are never treated separately. The tempo is free, there is no guide track, and the interaction between orchestra and conductor should be as smooth as possible. An additional ongoing dialogue between the conductor or sound engineer would be required in order to synchronize the recording in the project with existing takes during the recording.
Therefore, the recording simply runs through during such recording sessions and after it the recording is available in different takes in one or more source projects one after the other.
If the recordings are later to be edited together with the source destination cut, this creates the problem of having to constantly jump back and forth in the project or switch between projects to compare takes and find the right sections. This is where multi-synchronous cut comes in handy:
Based on a content analysis of the audio material, different recording takes of the same passage of a piece of music are recognized and displayed one below the other in a special overview project. Each take of a multitrack recording is represented by a single reference object on its own track, with musical passages recognized as the same being displayed on top of each other.
The selection of the takes is done by selecting the track of the reference object and the selection of a time section (Source In/Out points). Without changing the project window or manually moving the play cursor, the takes can be compared and combined in a similar way to comping with the take lanes. "Visual time stretching"(time alignment) is used to synchronize passages that belong together musically, even with slightly different tempos: The waveforms are slightly compressed or stretched to synchronize the takes. However, this display only applies to the overview project; the audio material is displayed normally in the destination project.
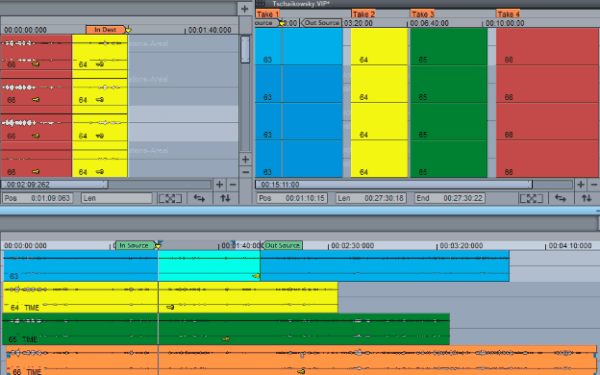
In the overview project below the take is selected, the area to be used from the take is defined by the source markers. In the source project on the right, you can also see the source markers.
MuSyC Preparation
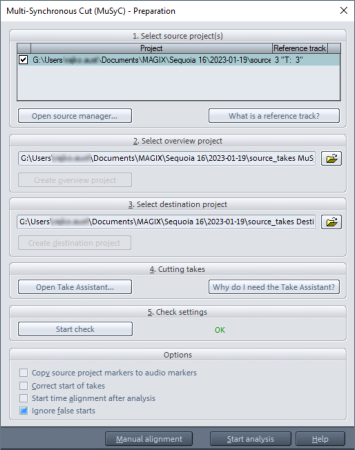
Before performing multi-synchronous cut, the Sequoia session must be prepared accordingly. To do this, open the dialog Multi-Synchronous Cut (MuSyC) - Preparation with menu Edit > Multi-synchronous cut > MuSyC Preparation....
-
Select source projects: You are working with MuSyC in a multi source session. Source and destination project means that the project in which the cut version is created is different from the one in which the raw data was recorded. All source projects are displayed in the list.
You use the Source manager, which can also be opened from here with the button, to specify which of the loaded projects act as source projects:
-
Load all the source projects you want to use.
-
Select the projects in the Source Manager and press the button Add active source project to the list (S+). Unused source projects can be deleted from the source list by selecting them and pressing the Del key.
-
Activate the source projects one by one and set the reference track (see below).
-
-
Select overview project: The overview project is displayed in the field, an existing overview project can be loaded via the folder button. With Create overview project a overview project can be created for the current MuSyC session, if one does not already exist. The button opens the dialog New project.
-
Select destination project: In the same way, a destination project can be loaded here and, if necessary, a new one can be created.
When saving a MuSyC overview project, a Sequoia session file (
*.samx) is suggested to be saved together with the project, which contains all opened projects and their layout. This allows you to load overview project, source and destination projects together at a later time. -
Cutting takes: For the analysis to work, it is essential that all takes in the source projects are in separate objects. The Take assistant helps to find takes based on silence in the reference track of the source project and to cut the objects on all tracks at these locations to create new takes that MuSyC can use for analysis.
-
Check settings: Click Start Check to verify the current settings. If a green OK appears, everything is set correctly.
-
Options: Before starting the analysis you can set some more options:
-
Copy source project markers to audio markers: Use this option to convert source project markers into audio markers.
-
Correct start of takes: This option automatically shortens the start of takes after analysis. Improved analysis results may be achieved if this is done prior to analysis. To prevent the time adjustment at the beginning of the music from being inaccurate, the beginnings of the takes must not contain several seconds of silence or other sounds that do not belong to the music. You can find help with this task using the Take assistant.
-
Start time alignment after analysis: This option starts the time alignment automatically after analysis. If you leave this option off, you can check the overview project after the analysis and correct it if necessary before you start the time adjustment (Edit menu > Multi-Synchronous Cut > Time Alignment > Align all objects).
-
Ignore false starts: Use this option to ensure that false start takes are excluded from the analysis.
-
-
With Start analysis the analysis of the source material is started and the overview project is filled with the takes found: Takes recognized as the same are arranged one below the other, all other takes are arranged one behind the other on the first track.
-
Now you can edit your takes from within the overview project using the source-destination edit.
MuSyC Reference Track
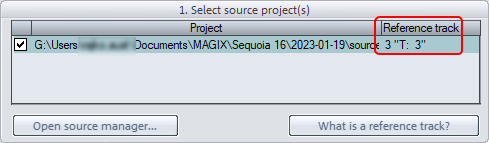
The reference track is the track in the source project that is used to identify the various takes in the source project that are to be displayed synchronized in the overview project. It is therefore the "master track" for the multi-synchronous cut.
Any mono or stereo track of the source project can serve as a reference track. Typically, you will use the track of the main microphones as a reference track. A rough mix can also be created in a new track and this can be selected as the reference track.
The reference track is the track that is selected in the source project at the moment when the analysis is started and the overview project is created. At the top of the Multi-synchronous cut preparation dialog, in the list of source projects, you can see which track is set as the reference track in the Reference Track column for each source project.
Note: Make sure that the reference track contains audio material as continuously as possible, i.e. that there are no long pauses.
In this section